Customizing the GUI
Basic Changes Advanced Changes Special Commands Changing the Default Look and Feel
You can personalize the Graphical User Interface (GUI) to better suit your needs or style. For example, you can reorganize the menu bar and create, delete, or modify toolbars. The changes are stored in a configuration file, which is located in your ChemAxon user folder under the version number which the customization was made with.
{info} Make sure that your
configuration.xmlfile is copied under the newly created folder when you update to a newer version of MarvinSketch.
To restore the default settings, simply delete the configuration file, the system will create a new file. For more information about configuration and the configuration file, see Customizing MarvinSketch GUI - Server Side.
Basic Changes
To move a toolbar, simply drag it. While dragging the toolbar, you can see a colored border around it, indicating the place and direction of movement. Depending on the current Look&Feel the colors of the border are different.
You can change the visibility of toolbars in the View > Toolbars menu. To hide the menubar, choose View > Menubar. To show it, press F11 after clicking on the canvas. The View > Status Bar turns the status bar on or off.
Advanced Changes
The graphical user interface of MarvinSketch can interactively be personalized by navigating to View > Editor Style > Customize.
{info} To make the procedure faster, the customization related functions usually do not ask for confirmation before taking action.
The original interface can be restored at any time by choosing View > Editor Style > Reset Current Configuration. The Customize dialog consists of the following tabs:
Menus Tab
The Menu tab consists of the following parts:
- Menu: You can choose a menu from the Menus drop-down list.
- Menu Contents: Displays Entries that are associated with the selected menu.
- Details: This box displays a short help text for the selected menu entry.

The table below lists the available menu commands.
| Command | Description |
|---|---|
| New | Creates a new menu and places it at the end of the menu bar. |
| Menu > Move | Allows altering the position of main menus. |
| Menu > Rename | Renaming a menu in an appearing dialog. |
| Menu > Delete | Removes a menu with all of its contents. |
The table below lists the available menu contents commands.
| Command | Description |
|---|---|
| Add | Makes the above Add Commands dialog visible, where you can browse all available commands of MarvinSketch.The commands are organized to Categories and are listed in alphabetical order. |
| Move Up/Down | Moves a menu element by one position in the container menu. |
| Modify > Add Submenu | Adds a new submenu after the currently selected element. |
| Modify > Begin a Group | Adds a menu separator after the currently selected element. |
| Modify > Rename | Renames a submenu or menu element.You can also change the mnemonics by replacing the ampersand (&) in the name. |
| Modify > Delete | Removes the menu element or submenu. |
Popups Tab
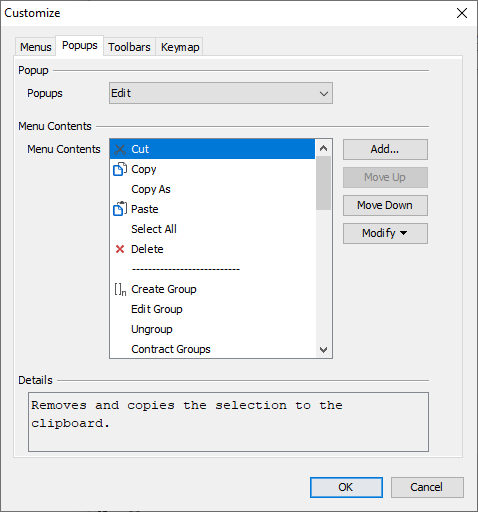
The customization of pop-up menus is similar to normal menus. However it is not possible to remove, rename, or create a new pop-up menu, you can only change the contents of the available pop-up menus. The reason for this is that these menus are context-sensitive, and their name and existence are bound to the underlying contexts.

Toolbars Tab
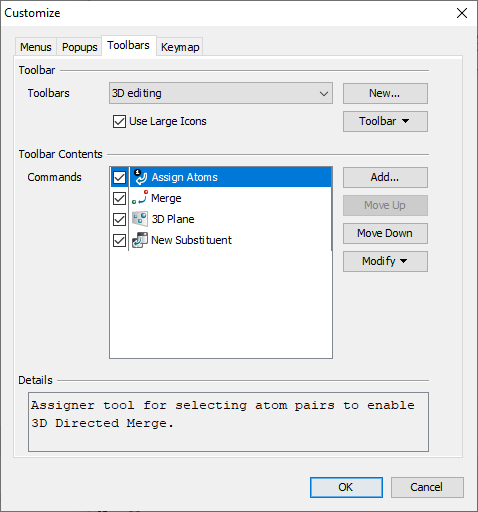
The Toolbars tab consists of the following parts:
- Toolbar: You can choose a toolbar from the Toolbars drop-down list.
- Toolbar Contents: Displays Commands that are associated with the selected toolbar.
- Details: This box displays a short help text for the selected toolbar command.

{info} The Advanced Template Toolbar cannot be customized.
The table below lists the available toolbar commands.
| Command | Description |
|---|---|
| Use Large Icons | When checked, all toolbar buttons have 24x24 pixel sized icons, otherwise the 16x16 pixel versions.By default, the large icons are used. |
| New | Creates a new toolbar and places it north to the first row having some space on the right-hand side. |
| Toolbar > Rename | Renaming a toolbar in an appearing dialog. |
| Toolbar > Delete | Removes a toolbar with all of its contents. |
| Toolbar > Icons Only | The buttons contained by this toolbar will be shown by icon only.Those commands that do not have a corresponding icon defined will be shown by text in this case too. |
| Toolbar > Text Only | The buttons contained by this toolbar will be shown by text only. |
| Toolbar > Icons & Text | Icon and text will also be shown for the buttons contained by this toolbar.The text is appearing below the icon. |
The table below lists the available toolbar contents commands.
| Command | Description |
|---|---|
| Add | Makes the Add Commands dialog visible, where you can browse all available commands of MarvinSketch.The commands are organized to Categories and are listed in alphabetical order. |
| Move Up/Down | Moves a toolbar element by one position in the container toolbar. |
| Modify > Rename | Renames an element.You can also change the mnemonics by replacing the ampersand ( & ) in the name. |
| Modify > Delete | Removes the element or separator. |
| Modify > Begin a Group | Adds a toolbar separator after the currently selected element. |
Keymap Tab
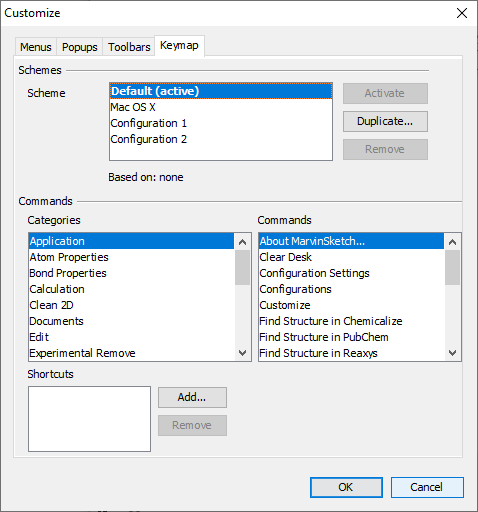
It is possible to define and switch between Keymap Schemes. Each Scheme is a different shortcut-set. On the Keymap tab, you can browse all available commands of MarvinSketch to define shortcuts to any of the commands.

Only one scheme can be active at a time. To activate a scheme, click the Activate button. If a scheme is based on another it means that all of the shortcuts are inherited from the base scheme, although, they can be overwritten one-by-one. Duplicating a scheme will create and activate a new scheme which will be based upon the previously selected one. Schemes—except the default one—can be removed.
To add a shortcut, follow the steps below.
- Click the Add button.
- When the Add Shortcut dialog opens, press the desired key or keys.
- Click OK. The shortcut can be used now.

If the shortcut already exists, a warning message appears and shows which command uses the shortcut. By clicking the Tab button the Tab key can be mapped as a shortcut. By clicking the Clear button you can remove a shortcut from the field. Keymapping can be defined on the server-side as well.
Special Commands
Some elements are not part of the default configuration of MarvinSketch but you can add them through the customization dialog.
These are as follows:
- Lone Pair Group
- Radical Group
- Free Radical Group
- Manual Atom Map
- Reaxys® Generics
- Substitution Count
To add new elements to the default list, follow the steps below.
- Select View > Editor Style > Customize.
- Choose the tab to which the element will be added.
- Choose the option from the dropdown list in the upper panel.
- Click Add at the contents section.
- Select a Category in the opening Add Commands dialog box.
- Select an entity from the Commands panel. The Details panel summarizes the main features of the selected command.
- Click Add.
- Click Close or add a new command.
Lone Pair Group
The toolbar and the menu can be customized to contain the Lone Pair Group tool. Before adding this tool disable Automatic Lone Pair calculation ( Preferences > Structure ) to be able to set the lone pairs manually and make sure that View > Advanced > Lone Pairs option is enabled. Categories: Insert Lone Pair Commands:
- Increase Lone Pair
- 0 Lone Pair
- 1 Lone Pair
- 2 Lone Pair
- 3 Lone Pair
- 4 Lone Pair
- Lone Pair Group
Radical Group
You can add the Radical Group to your MarvinSketch configuration. Categories: Insert Radical. Commands:
- Radical switch
- Monovalent radical and
- Radical off
- Radical Group
Free Radical Group
You can add the Free Radical Group to your MarvinSketch configuration. Categories: Insert Free Radical Commands:
- 0 radical
- 1 radical
- 2 radicals
- 3 radicals
- 4 radicals
- Increase Radical
- Free Radical Group
The last one increases the number of radical electrons on the atom by one. The maximum number of radicals is 4.
Manual Atom Map
Categories: Structure Commands:
- Manual Atom Map
- Manual Atom Map-Unmap Group
- Unmap Atoms
- Manual Atom Map
Reaxys® Generics
This template library contains the generic abbreviation commonly used in the Reaxys® database. Categories: Insert Template Commands:
- Reaxys® generics
Substitution Count
Categories: Atom Properties Commands:
- Substitution Count off
- Substitution Count as Drawn
- 0 substituent
- 1 substituent,
- 2 substituent
- 3 substituent
- 4 substituent
- 5 substituent
- 6 substituent
Changing the Default Look and Feel
The default Look&Feel (skin) can be changed by editing the marvin.properties which can be found in the following folder:
C:\Users\<username>\chemaxon
| Name of the skin | The line to be added |
|---|---|
| Metal | skin=javax.swing.plaf.metal.MetalLookAndFeel |
| Nimbus | skin=com.sun.java.swing.plaf.nimbus.NimbusLookAndFeel |
| CDE/Motif | skin=com.sun.java.swing.plaf.motif.MotifLookAndFeel |
| Windows (Default on Windows, can be deleted) | skin=com.sun.java.swing.plaf.windows.WindowsLookAndFeel |
| Windows Classic | skin=com.sun.java.swing.plaf.windows.WindowsClassicLookAndFeel |
| Jgoodies Plastic XP | skin=com.jgoodies.looks.plastic.PlasticXPLookAndFeel |
| Jgoodies Plastic | skin=com.jgoodies.looks.plastic.PlasticLookAndFeel |